Tutorial
This document will walk you through writing a simple song in RP-8: everything you need to know to make your own music. There are two main things you'll learn: how to compose music in pattern mode, and how to arrange it in song mode. This workflow closely resembles how I begin new tracks in RP-8, and it might be a good starting point for you too.
If you have never used ReBirth before, I highly recommend you follow this tutorial, as it introduces several important ideas that are foundational to how RP-8 works. If you have used ReBirth, it's still probably a good idea to at least skim the tutorial, since RP-8 does not function identically to ReBirth.
Let's begin!
Pattern Mode: Composing and Experimenting
In RP-8, you compose music by writing patterns, which are sequences of up to 16 notes that you can play back in various orders to make songs. RP-8 starts up in pattern mode, which gives you direct control over every aspect of what RP-8 does, and is perfect for basic composition tasks and experimenting with sound design.
Make A Drum Pattern
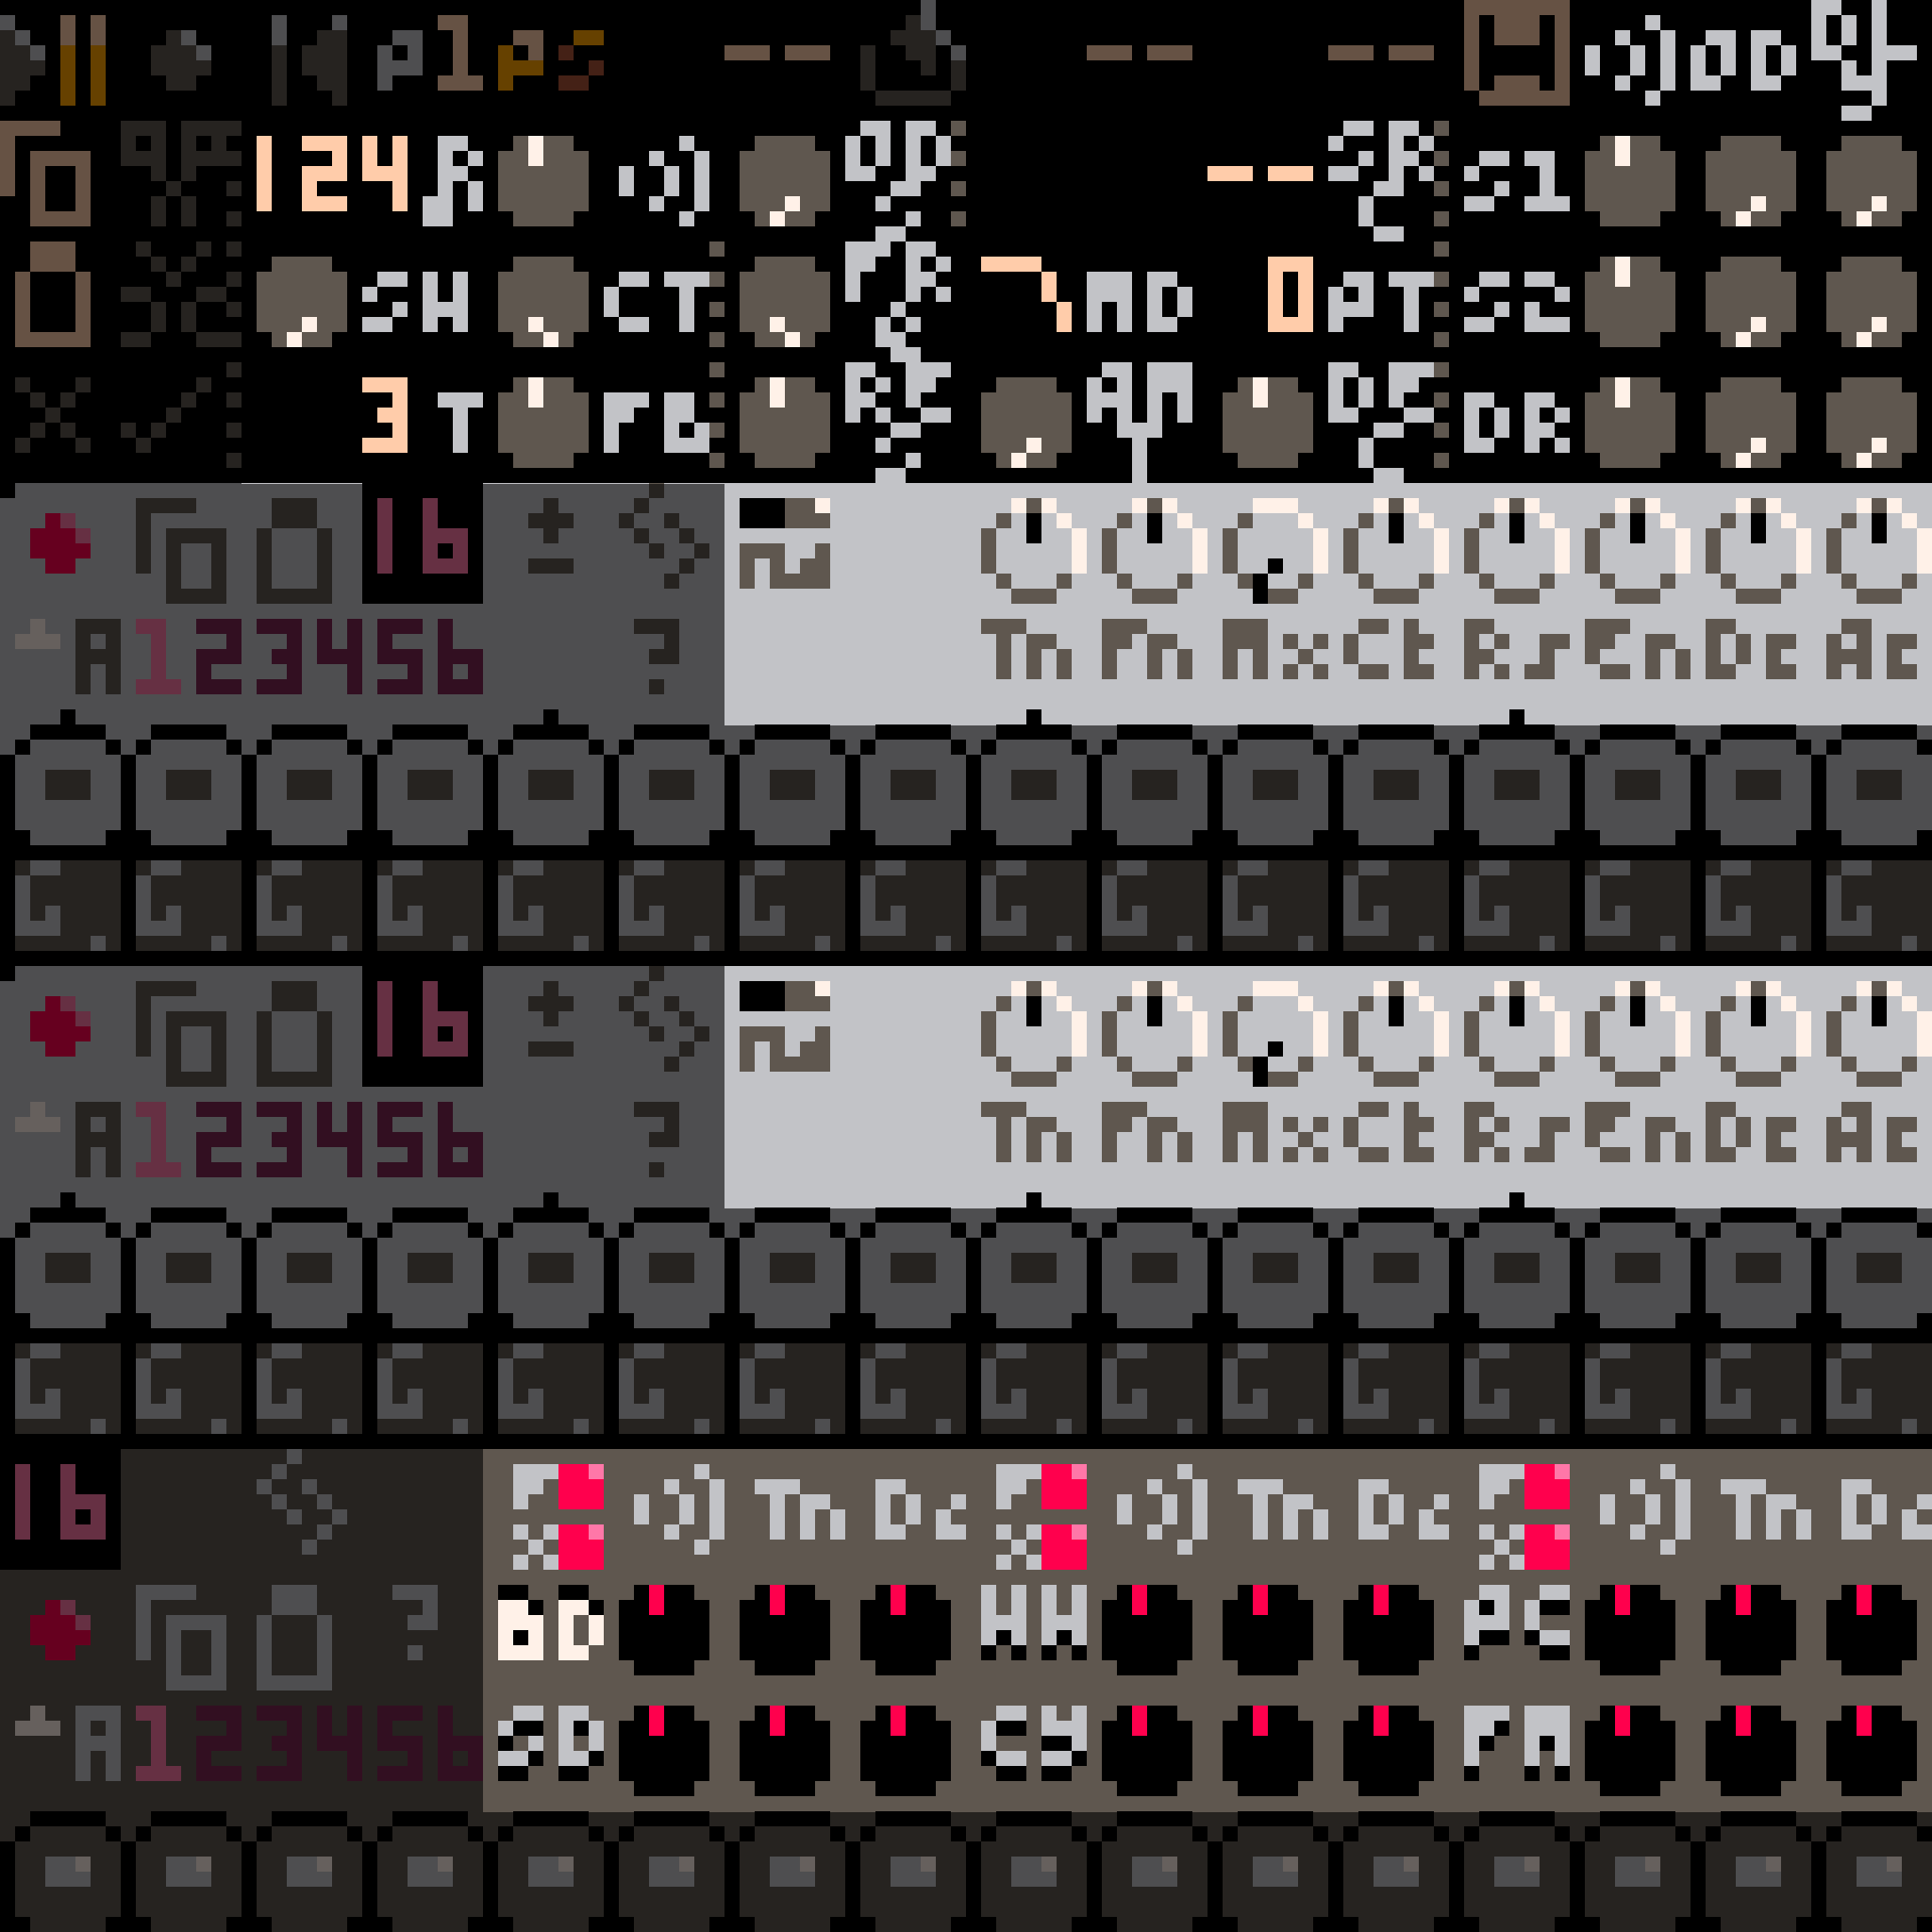
Drums are never a bad place to start, so let's make a drum pattern. The drum machine is at the bottom of the screen and looks like this:
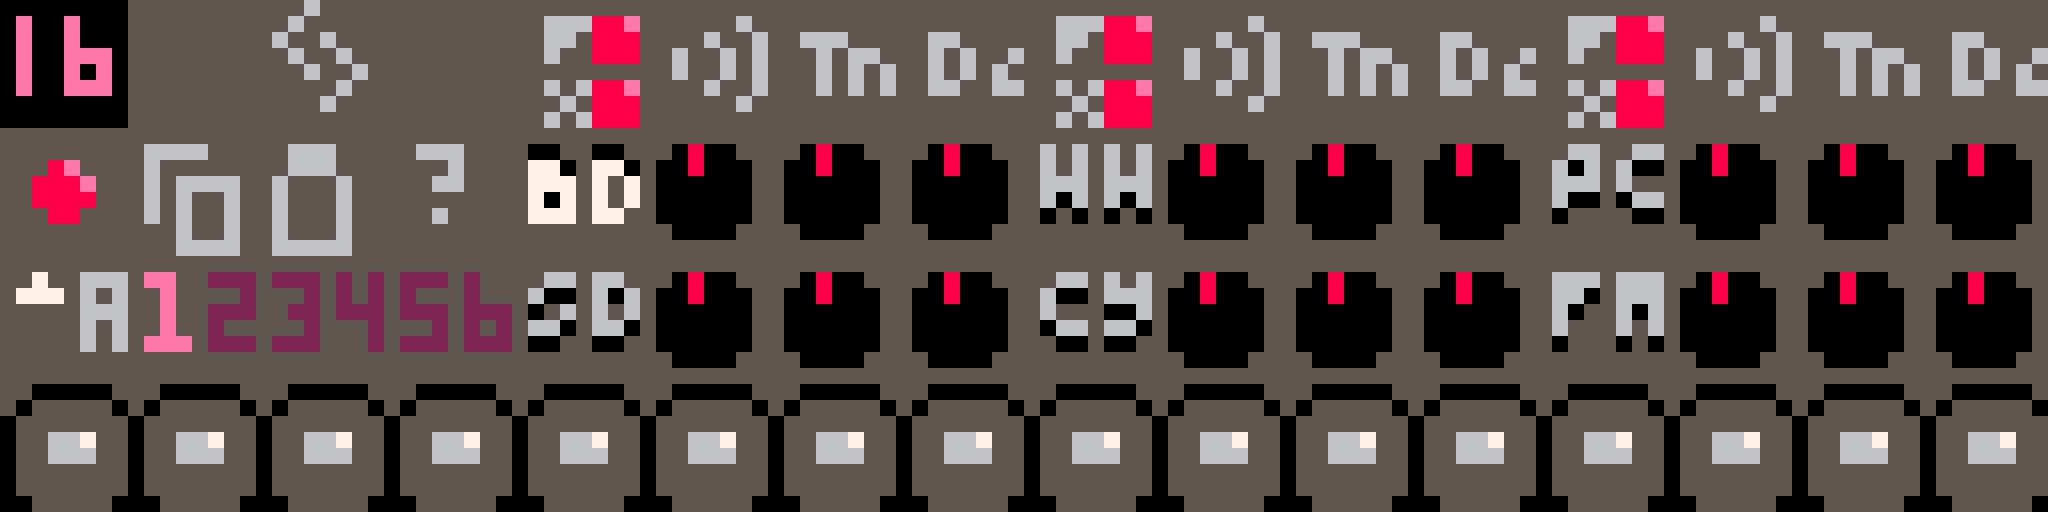
At the bottom of the drum machine are the step buttons, which control what kind of sound (if any) plays on each step. Click a few step buttons - you'll see that they light up - then click the play button at the top-left of the screen. You should hear a bass drum playing the steps that you clicked.
You may have noticed that the buttons can light up in different colors. For the drum machine, red and yellow are different variations of the sound, and the intensity of the light indicates the volume of the hit (brighter means louder). You can click a button multiple times to cycle through the options.
You have probably also noticed that the BD button on the drum machine is lit. There are 5 other similar buttons, each representing a different drum. If you click one, you'll see that the steps get cleared: this is because you're now editing a different drum in the same pattern.
TASK: Make a drum pattern using all 6 drums.
Make A Synth Pattern
You should be all set for drums at this point, at least for one bar. How about a melody or a bassline? For this you'll probably want to use one of the two synths, which look like this:
Like the drum machine, these have step buttons, but below the step buttons are note controls, which control what pitch the synth plays at each step. You can drag up and down on the note controls to change which note plays on each step.
TASK: Try making a one-bar melody.
Like the drum machine, the step buttons light up in different colors, but the meaning of the red and yellow colors is different. Red steps play notes as normal, but yellow steps are slides. Slide notes are longer and allow you to smoothly slide between pitch on adjacent steps. Dimmer steps are played normally, brighter steps are accented. Accented steps are louder, with shorter filter decay times but greater filter modulation. The amount of this effect can be controlled with the accent knob.1
Name and Save Your Song
Now that you've done some work, it's probably good to save your song so you don't lose it.
TASK: Press f or click on the disk icon to bring up the file menu, then use the arrow keys to navigate down to Rename Song, then press enter to open the song rename screen.. Enter a name for your song, and then (once you are back at the main RP-8 screen) press s to save your song. The song has been saved to the folder that RP-8 is in. To open this folder, you can go back to the file menu with f and select Open Folder.
You can also press p to quicksave your song to the clipboard. This is useful for quickly checkpointing your work. RP-8 does not have undo, so use this feature often, especially before you make changes you're not sure about! You can press o to quickload from the clipboard.
Check Out the Integrated Help
By now you have probably noticed that RP-8 uses hotkeys for many features. You can press h at any point to view a help screen with a list of hotkeys (and the URL to this user guide).
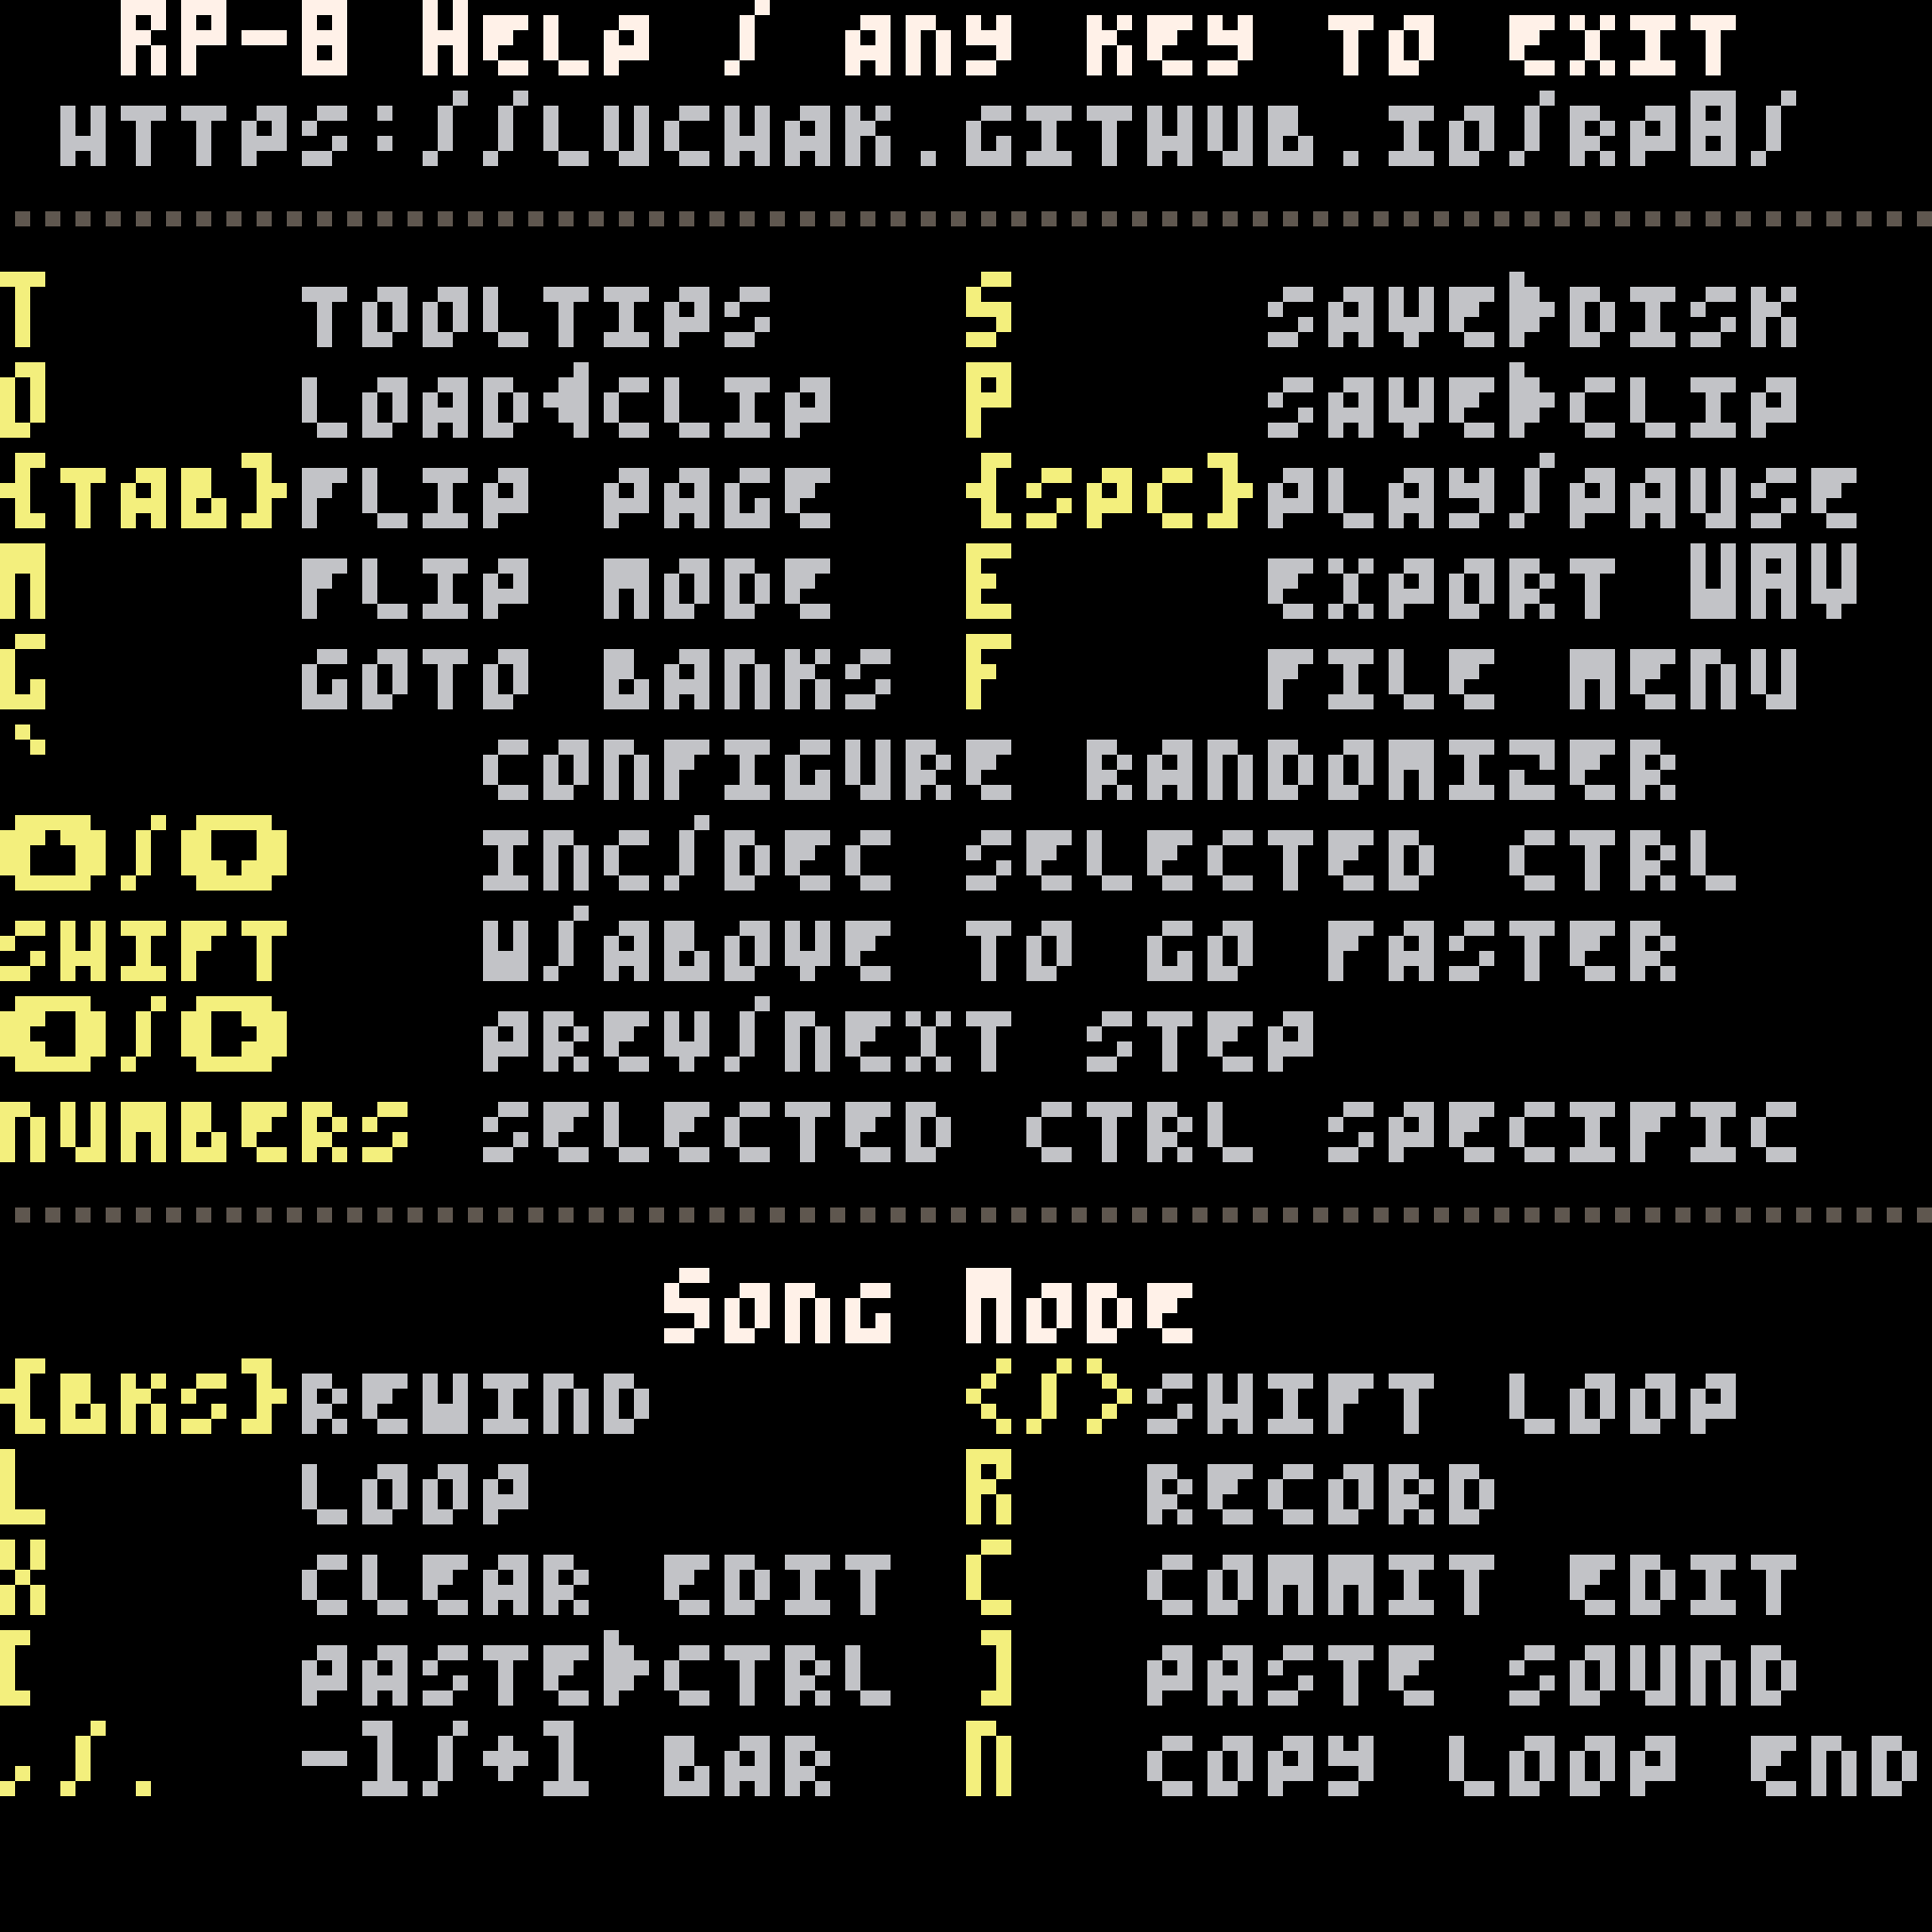
You can also press t in the main view to toggle tooltips on and off.
TASK: Try turning on tooltips and checking out some of the control labels.
Change the Sound
Ok, let's get back to making music. You've made a couple of loops, but you might find that the overall sound is a little ... uninspiring. The good news is that you can make it better! RP-8 is packed with sound design controls.
Both the synths and the drum machines have tons of knobs that affect the character of the sounds that they make, and the section at the top of the screen lets you mix and apply effects to these sounds. Use can use tooltips for more information on what each knob does.
TASK: Play around with the sound and dial in something you like!
Make More Patterns
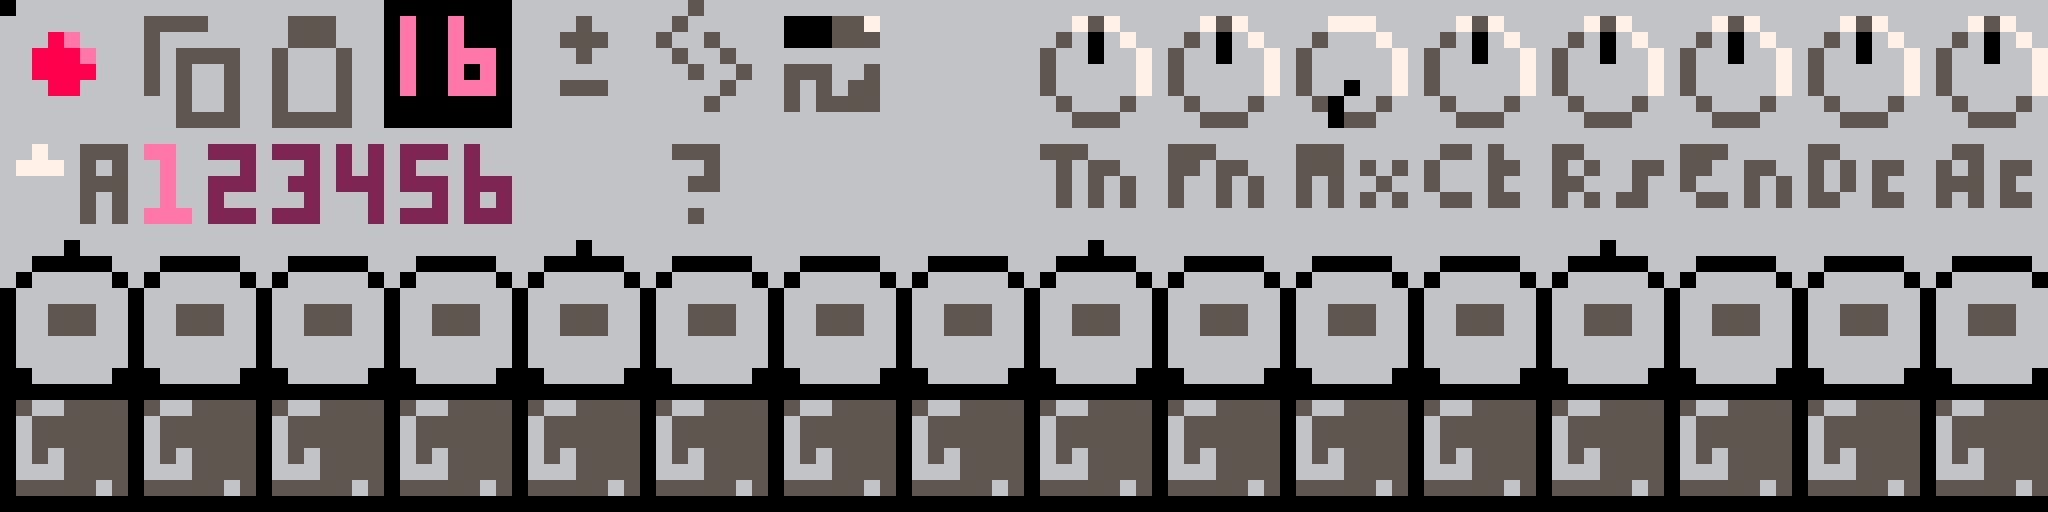
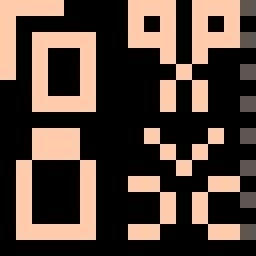
RP-8 supports multiple patterns to allow for variations and longer phrases. You can switch between patterns using the pattern and bank selector buttons:

There 8 banks (A-H) of 6 patterns each. You can drag on the bank selector to change banks, and click the number buttons to pick a pattern in the bank. If RP-8 is paused, the pattern will change instantly, if it is playing, then the pattern will change at the beginning of the next bar.
If you get lost and can't figure out which bank the current pattern is in, you can press b at any time to jump each bank selector to the current pattern's bank.

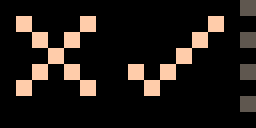
If you want to make a new variation of a pattern, you can use the pattern copy/paste buttons on the synths and the drum machine to duplicate a pattern to a new slot for further editing. You can copy patterns between the two synths, but not between the synths and the drum machine.
TASK: Make a few more patterns: maybe a bassline on one synth, a few bars worth of melody on the other synth, and one or two drum loop variations on the drum machine.
If you're having fun - keep going! It'll be helpful to be fairly comfortable in pattern mode before moving on to arrangement in song mode.
Song Mode: Arranging and Automating
Sometimes one bar of music just isn't enough. That's when it's time for song mode, which allows you to arrange multiple bars of music and record control movements. You can switch into song mode using the mode selector button, or by pressing m.
The most important change from song mode to pattern mode is that you are no longer in direct control of the sound design or of which patterns are playing. (Note that this does not include pattern contents, i.e. notes and steps. These are shared with pattern mode, and changing them still works exactly like pattern mode.) Instead, the RP-8 sequencer controls these, and any changes you make will be lost until you take special steps to record them. The sections below explain three different recording methods you can use.
Don't worry if this doesn't make total sense yet. Let's start arranging our song, and everything should become clearer in the process.
Choose A Loop Length
In song mode, you'll find song position and loop controls at the top of the screen. Each control's value is measured in bars:

These controls are essential in song mode. Not only do these controls let you choose which part of the song you are play back, but the loop controls also act as a "selection" in the song: there are many operations in RP-8 that perform an operation only on the bars contained in the current loop.
TASK: Since we are starting a new song, let's set our loop to start at bar 1 and be either 4 or 8 bars long. It's okay to start at bar 1 even if we think we might want to add an introduction, since RP-8's editing tools provide ways to move bars around later. If you forget which control is loop start and which is loop length, you can turn on tooltips with t for a reminder.
Copy A Loop From Pattern Mode
You've probably noticed that, in song mode, all your sound edits from pattern mode have been lost. Instead of recreating them manually, let's copy them over. You'll that there are copy/paste buttons not just on each device, but also near the top of the screen:

We can use these buttons to copy information about all the sound controls.
TASK: Switch back to pattern mode (by clicking the mode button or pressing m) and click the copy button, then switch back to song mode, and click the paste button. Your loop should now be filled with the same control configuration you had in pattern mode!
Recording, 3 Ways
We're now going to use three different recording methods to build up some changes and structure in your loop.
Change the Sound (Again)
This section demonstrates the first recording method: change-and-commit.
Try playing your new loop. (Make sure the loop enable control is turned on.) Now try changing some of the controls. You'll notice that your changes look like they stay in effect ... until you pause playback. Then all your changes are reset. You may also have noticed that the dark red record button next to the play button turns yellow when you start making changes. What's going on here?

When you start making changes, RP-8 notices that you've departed from the recorded sequence, and turns the record light yellow to warn you. Any controls you have changed will stay where you left them, but any controls you have not touched will stay under sequencer control. When you pause playback, RP-8 puts all controls back under sequencer control and resets their values.
But what if you like your changes?
Whenver you have uncommitted changes (i.e. the record button is yellow) the change discard/commit buttons will light up. The discard button clears your changes, just like stopping playback. If RP-8 is playing, control values will reset at the start of the next bar, if it is paused, they will reset immediately. The commit button, on the other hand, will keep your changes: each control you have modified will now keep its current position everywhere in your loop.
TASK: Try making some more changes to the sound in your loop. Then use the loop controls to select one or two bars within your loop, and change the sound only in those bars. Set your loop back to its original length again and listen to your new control automation!
Automate the Sound
This section demonstrates the second recording method: realtime recording.
The technique above is easy, but only lets you make changes in full-bar chunks. If you want a nice filter sweep, you'll have to use realtime recording instead. When you turn on record mode, by clicking the record button or pressing r, the record button will light up bright red, and RP-8 will begin immediately recording all control changes you make to the song.
If looping is enabled, RP-8 will forget about all changed controls each time playback loops. This allows you to record automation for multiple controls in the same recording session, and means that you don't have to quickly hit stop to avoid recording over the start of your loop.
When you pause playback, RP-8 will automatically exit record mode. You can also exit record mode by clicking the record button.
TASK: Press p to quicksave your song in case something goes wrong or you record something you don't mean to.
TASK: Go to the beginning of your loop, enable recording, and hit play. Move the synth filter cutoff knobs. Each time the song loops is a new take, so keep trying as long as you like!
Sequence Your Patterns
This section demonstrates the third recording method: step recording.
We're now going to record some pattern changes in your loop. You could do this using either of the previous two methods, but for pattern recording you often want to set patterns across many bars quickly. This is easy to do with step recording. When record mode is active, any changed controls are written to any bar you visit, even when paused. This means that you can enable recording, make some changes, and step forward or backward in the song to write those changes to each new bar.
TASK: Press p to quicksave.
TASK: Sequence all the pattern changes you want in your loop! Go to the first bar of your loop and enter record mode. Then select the patterns you want to play on that bar. Then use the the . key to move one bar forward and select the patterns you want to play on that bar. If you want to keep the same patterns for multiple bars, you can just skip through them, you do not need to click the pattern buttons again. If you make a mistake, you can backtrack with the , key to fix it, or if you make a big mistake, press o to quickload your last checkpoint.
Note
You can also use the mouse to drag the song position control to navigate while recording is active, but, if you try this, use extreme care. Every control modified in the current recording session will be written to every bar you visit! You can easily overwrite many bars worth of sequencer data if you're not careful.
Nice work! You now have a fully-sequenced loop. Let's finish this all off by copying your loop and making a variation.
Duplicate Your Loop
To make major changes to the arrangement, we need to use the song editing tools near the top of the screen. Two of these, copy and paste, should be familiar from earlier, since we used them to initialize our loop from patern mode.
All of these features use the current loop as their active selection.
TASK: Click the copy button to copy the current loop. Then click the insert button, which will insert the copied bars into the current loop, moving the current loop and all later bars back to make space. You have just created a duplicate of the loop! Keeping the loop length the same, advance the loop start to the end of the current loop, so we can start editing the duplicated content.
TASK: Use what you have learned so far to write a B section to this tiny song.
Create an ABA Structure
Let's do one more sequence edit, to add a copy of the original loop at the end of your B section, for a very brief ABA structure.
TASK: Move the loop back to the beginning of the song, and copy your original loop. Then advance your loop point just past your B section and click paste.
Export To Audio
All right, we're ready to finish this off! Now we just need to use the .WAV export feature to render your song to audio. There are two steps: first, prep your song for export by creating a few silent bars at the end. Then just enable export and play your song from the start.
TASK: Add some silent bars at the end of your song. Move the loop past the end of the song and use change+commit recording to disable all three instruments for this section (click the red circle on the left side of the instrument to toggle whether it is enabled). Leave this loop enabled at the end of the song - you want to "trap" the playback position here after export so you don't get unexpected sounds at the end of your recording.
TASK: Go back to the beginning of your song, and, while paused, press e to enable export. Then play your song to the end, and press e when done. You'll see a new .WAV file on your desktop containing your exported audio.
Closing Thoughts
Congratulations! You've just made a very short song with RP-8. Go make more!
For more information on how the devices work and what specific controls do, see the [Reference] section. For quick reminders in RP-8, remember that you can turn on tooltips with t or access help with h.
If you get stuck or encounter what seems to be a bug, please get in touch.
-
RP-8 tries to approximate the accent behavior of the TB-303, but it's a loose resemblance. ↩