Reference
Basic Usage
Most controls on the screen respond to one of a small number of gestures: clicks, vertical drags, and double clicks. Generally, clicking either activate a button's effect or toggle a button's state, dragging will alter the value of a knob or a numeric control, and double-clicking will reset a knob to its default value. There are also a few buttons for manipulating pattern data that respond to vertical drags (the transpose and rotate pattern buttons).
When you click or drag a control, it becomes highlighted in blue. This indicates that the control is now selected, and will respond to control-specific keyboard commands, such as the up and down arrow keys for altering step, note, or knob values. If a control does not get a blue highlight, that means it is disabled in the current mode -- for example, you cannot change the song position in pattern mode.
Transport

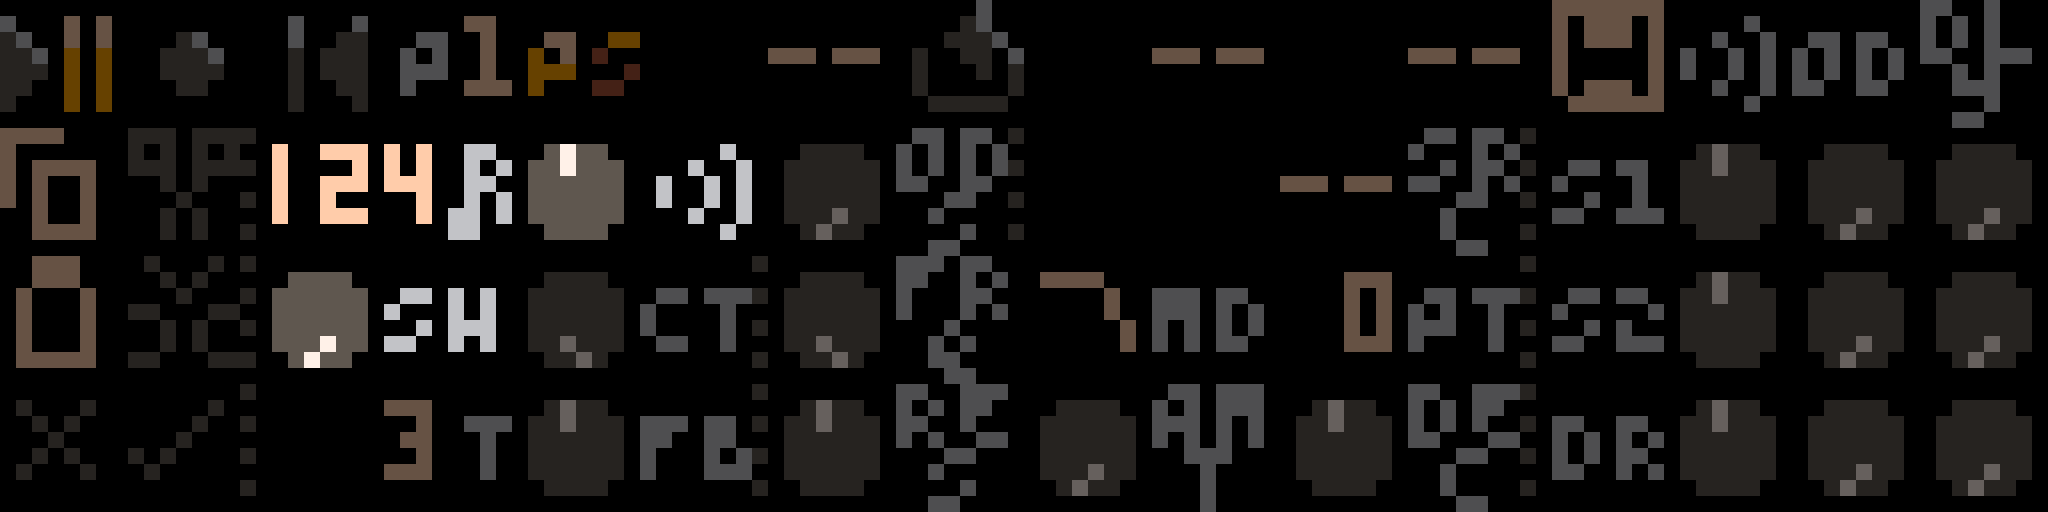
The transport provides control over RP-8's playback and overall behavior. In pattern mode, you can start or pause the sequencer, change between pattern mode and song mode (see Modes), switch sequencer pages (see Pages), and access the file menu (see Loading and Saving). In song mode, the position control, loop enable/start/length controls, and record button will also become available.
To change the numeric controls, click and drag up/down to increase/decrease the values, or use the arrow keys.
The rewind button will jump to the start of the loop with a single click, or to bar 1 with a double click.
Modes
RP-8 has two modes: pattern mode and song mode. All the same devices and sound creation machinery are available in both, however, they have different purposes. Pattern mode gives you immediate direct control of every parameter, so it is ideal for learning, experimentation, and coming up with new ideas. Song mode records enables several features for recording, editing, and replay of parameter changes, and so is best for when you want to start recording multi-bar sequences and complex automation.
Pages
The RP-8 UI also has two sequencer pages, each accessible in both pattern and song modes. You can toggle between them with the tab key, or by clicking the P1 / P2 button near the top of the screen. Each page shows a different set of pitch controls for each pattern.
RP-8 starts on page 1. This page lets you control the pitch of oscillator 1 on both synths, and shows the drum pattern step buttons.
Page 2 shows secondary / relative pitch controls for all three devices. These controls let you detune each drum (on the drum machine) or the second oscillator (on each synth) relative to the main pitch for each device. For the synth, this means you are detuning oscillator 2 relative to oscillator 1. For the drums, you are detuning each drum relative to whatever pitch is determined by the sound controls. (The base pitch of each drum with all knobs at their default positions is usually G in some octave.)
Loading and Saving
To load a song, drag the song file onto the RP-8 window. Alternatively, you can copy the song data to your clipboard, paste it into RP-8 (using ctrl-v on Windows/Linux or cmd-v on MacOS), and use the o hotkey to load from the clipboard.
To save songs, you can use the file menu.
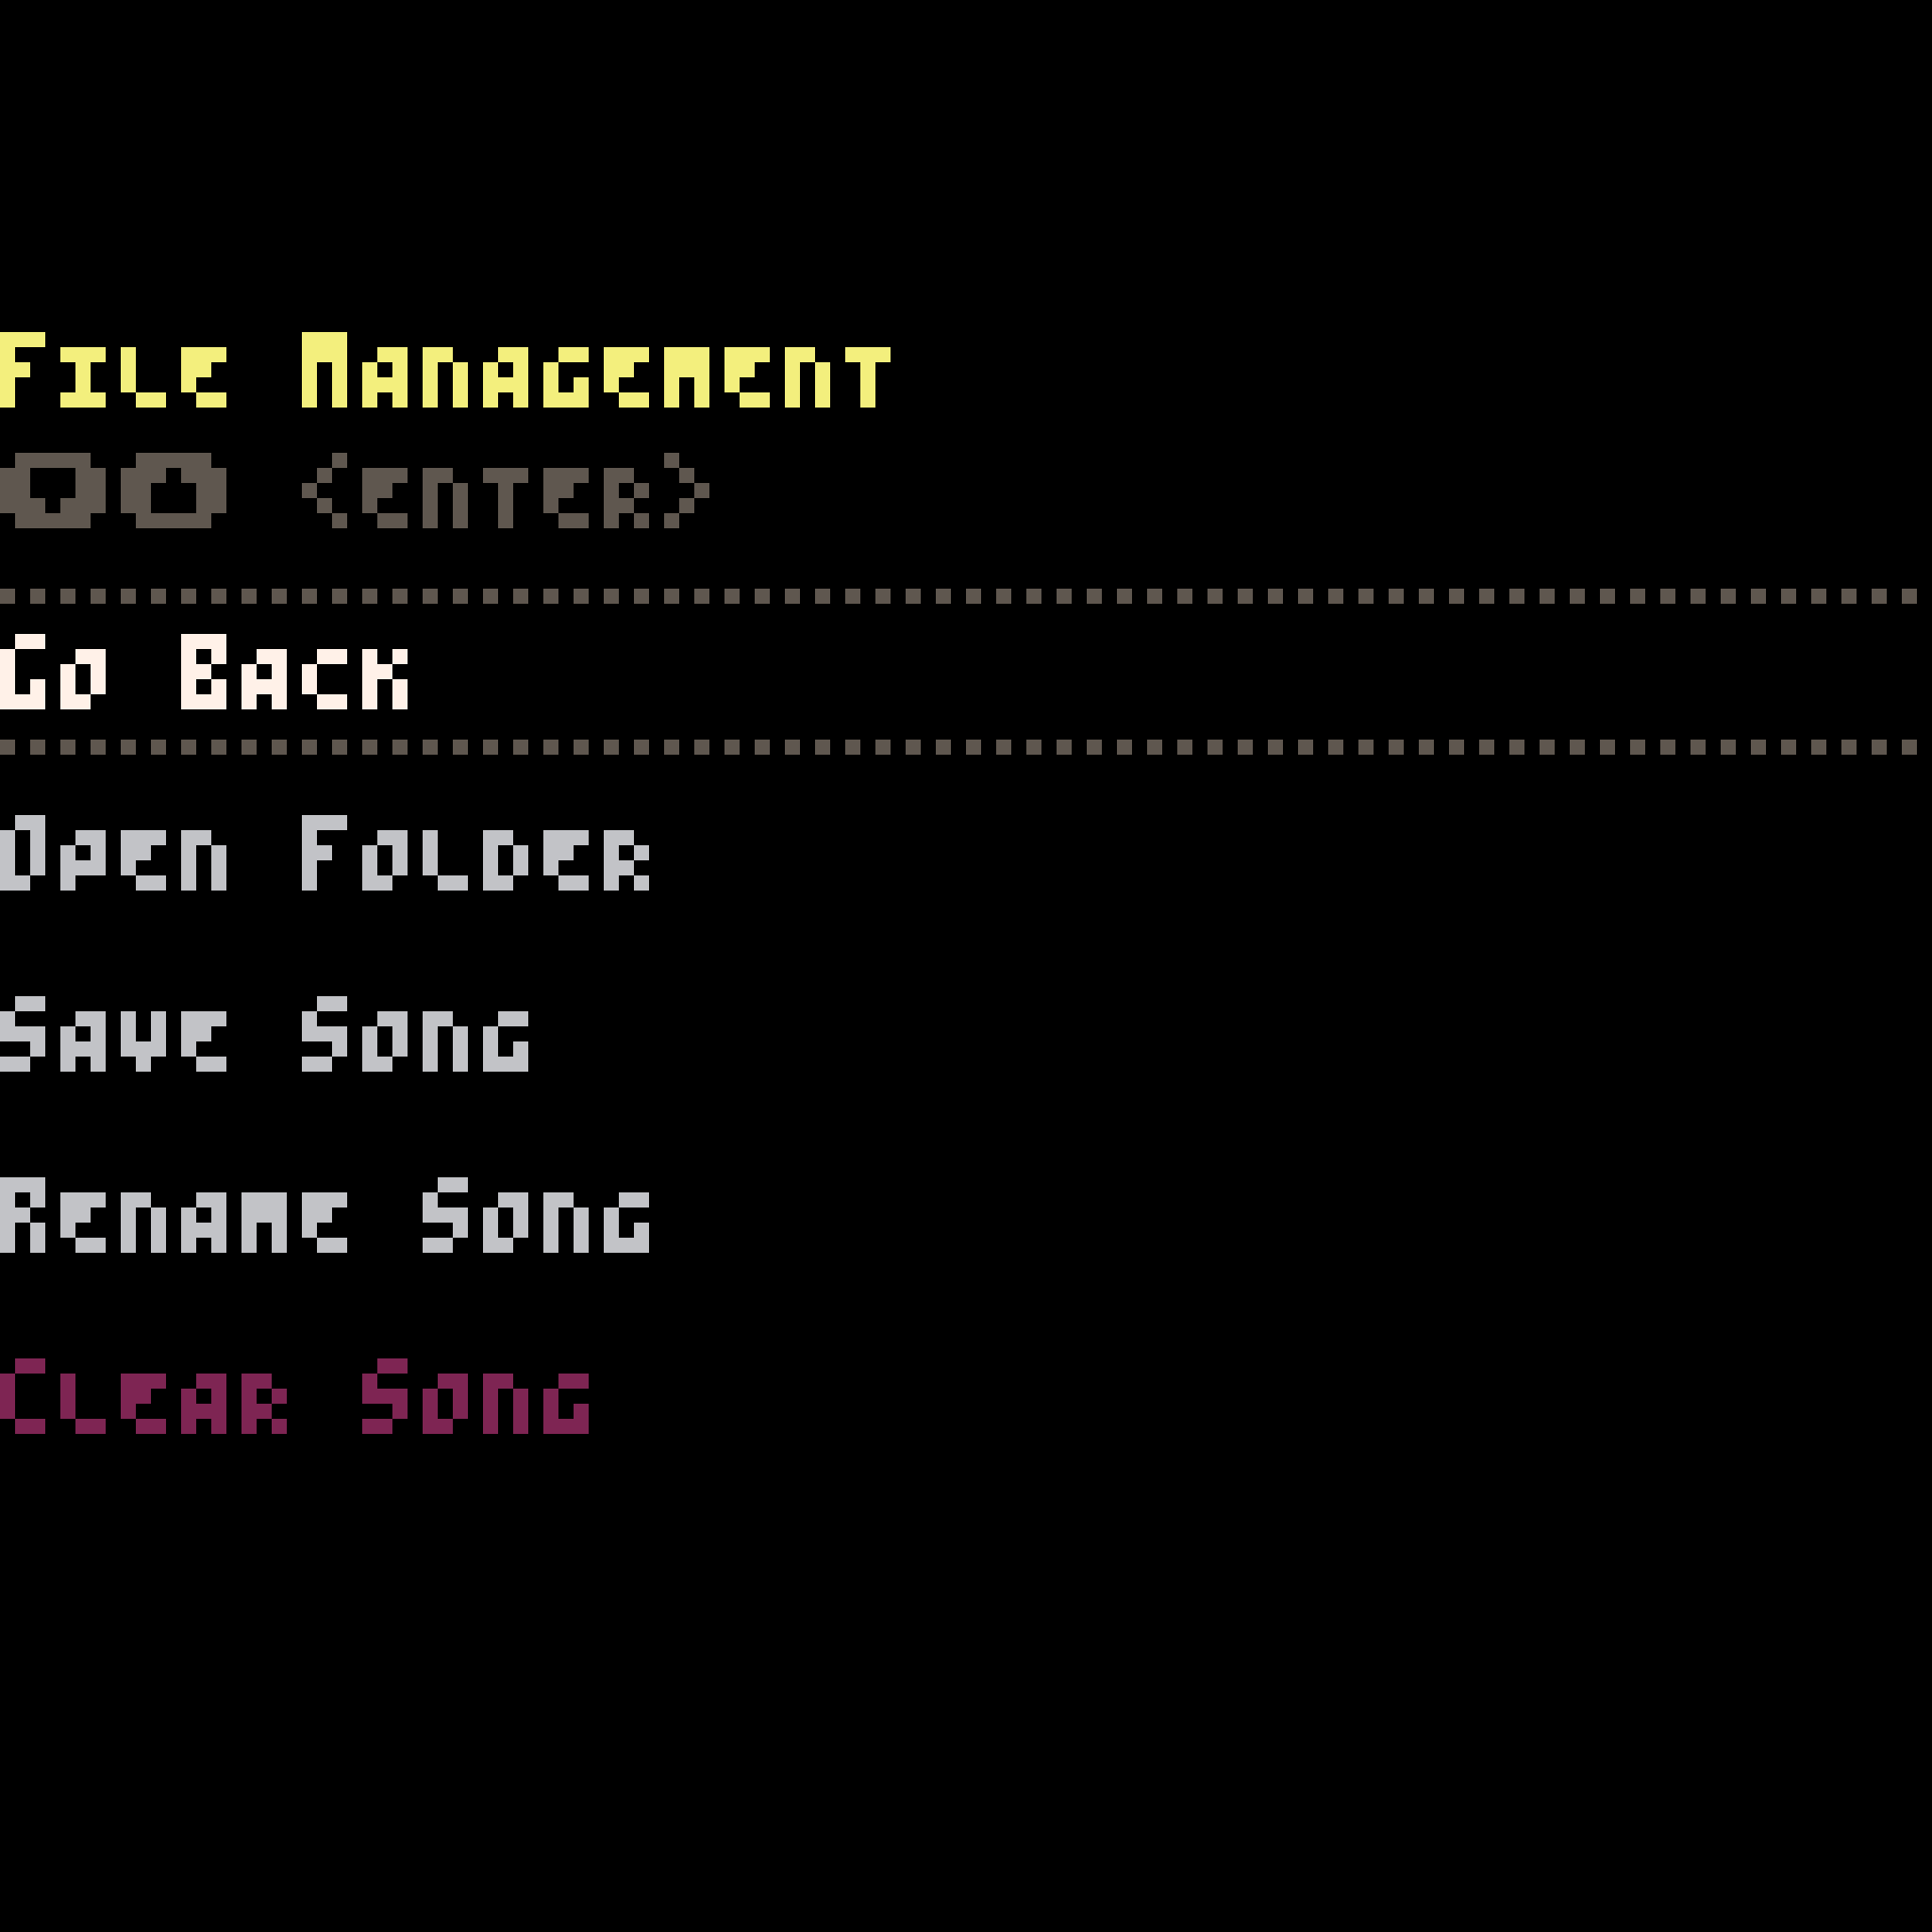
This screen allows you to name your song and save it, as well as open the RP-8 data folder - which, depending on your OS and how you are running RP-8, may be difficult to find otherwise. Use the up and down arrow keys to select an option, then the enter key to act. You can access this menu by clicking the disk icon by the transport controls, or by using the f key.
Arrangement Editing
Below the transport, on the left side of the screen, are buttons for editing song arrangements. Copy and paste are available in all modes, the rest are available in song mode only.

The buttons act as follows:
Copy sequence. Copies the current pattern and control settings (if in pattern mode) or loop, including all automation (if in song mode).
Cut sequence. Acts identically to copy sequence, except it removes the current loop's bars from the song. Later bars are moved up to fill the empty space.
Paste sequence. Fills the current loop with the last copied sequence. If the copied sequence is shorter than the current loop, it is repeated to fit. If the copied sequence is longer, it is truncated. Sequences copied from pattern mode are treated as one-bar loops with no automation, and sequences pasted into pattern mode use only the first bar (and no automation).
Insert sequence. Inserts new bars into the song to fill the current loop, so that the loop's old contents are now located just after the loop. The new bars are then filled with the copied sequence, just as with paste.
Commit overrides. Commits the values of all currently-overridden controls to the loop. This will overwrite any automation for those controls.
Clear overrides. Clears all control overrides and returns any overridden controls to their values as recorded in the song. This action takes effect at the start of the next bar.
There are also a two keyboard-only arrangement commands. [ acts like the paste button, but applies only to the currently-selected control. This allows you to selectively transfer automation for only some controls. ] also acts like the paste button, but does not transfer pattern selections (transfers sound controls only). This lets you copy sound design from one part of your song to another without overwriting the pattern arrangement.
Tempo, Shuffle and Volume
The tempo control, marked with a little note symbol, displays the current tempo in beats per minute. RP-8 supports tempo settings from 60 to 188 bpm in 1 bpm increments. Tempo can be automated over a song just like any other control.
Shuffle, marked with SH, offsets the position of every other 16th note step - pushing each one later. For triplet swing, set shuffle about 2/3 of the way to its maximum position. Shuffle is applied to all instruments.
The volume control, marked with a small speaker symbol, controls the level of RP-8's output. RP-8 applies soft saturation at the output to avoid clipping, so you can also use this as a second distortion effect on the main mix. You can separately control the level of Pico-8's main output via the pause menu, accessed with enter: the volume control is located in a submenu under the Options heading.
Devices
Sound in RP-8 is generated by its 3 devices: two identical 2-ocillator synthesizers loosely inspired by the Roland TB-303 and one drum machine that is even more loosely inspired by the Roland TR-808. These devices are explained in more detail in their own sections below.
In general, you should use the synthesizers for tonal elements in your songs, like melody or bass lines, and you should use the drum machine for rhythmic elements. However, all the drums have a tuning adjustment knob, and many of the sounds can have a strong tonal character, so stay open-minded!1 Each device is controlled by a pattern sequencer, which plays back sequences of notes or drum hits from a user-programmable bank of patterns. Patterns are 16 step (1 bar) series of notes or drum hits, and are the building blocks of music in RP-8.
RP-8 also has effects units and a mixer, whose controls are all located in the transport and mixer section at the top of the screen.
Audio Signal Flow

Each of the two synthesizers and the drum machine is routed into its own overdrive unit. The overdrive outputs are sent to the mixer, which separately mixes these voices into a dry signal and a delay send signal. The delay send signal is sent to the delay effect, whose output is then mixed with the dry signal and sent to the compressor. Finally, soft saturation is applied to the signal before it is output to the speaker.
The drum machine and the pattern filter can vary this routing a little bit, see their sections for more details.
Device Pattern Controls
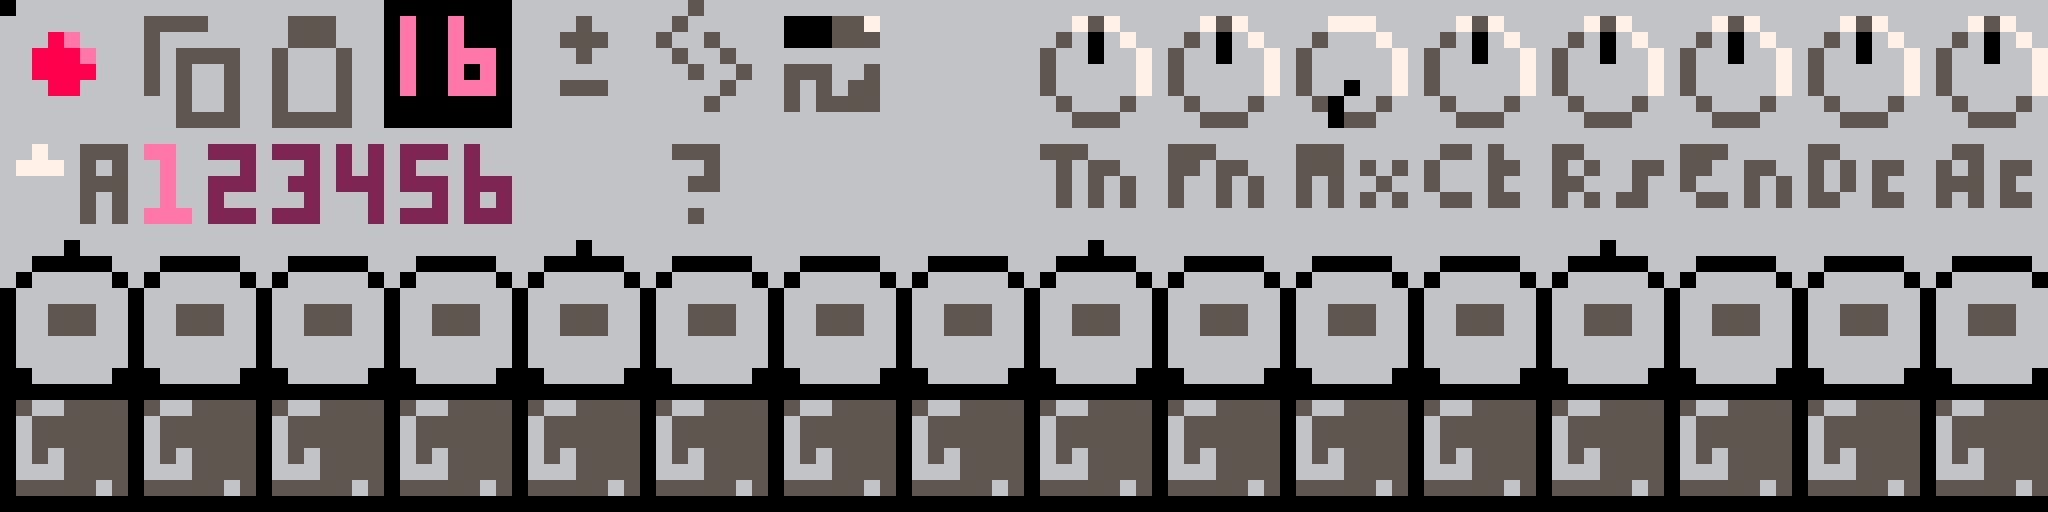
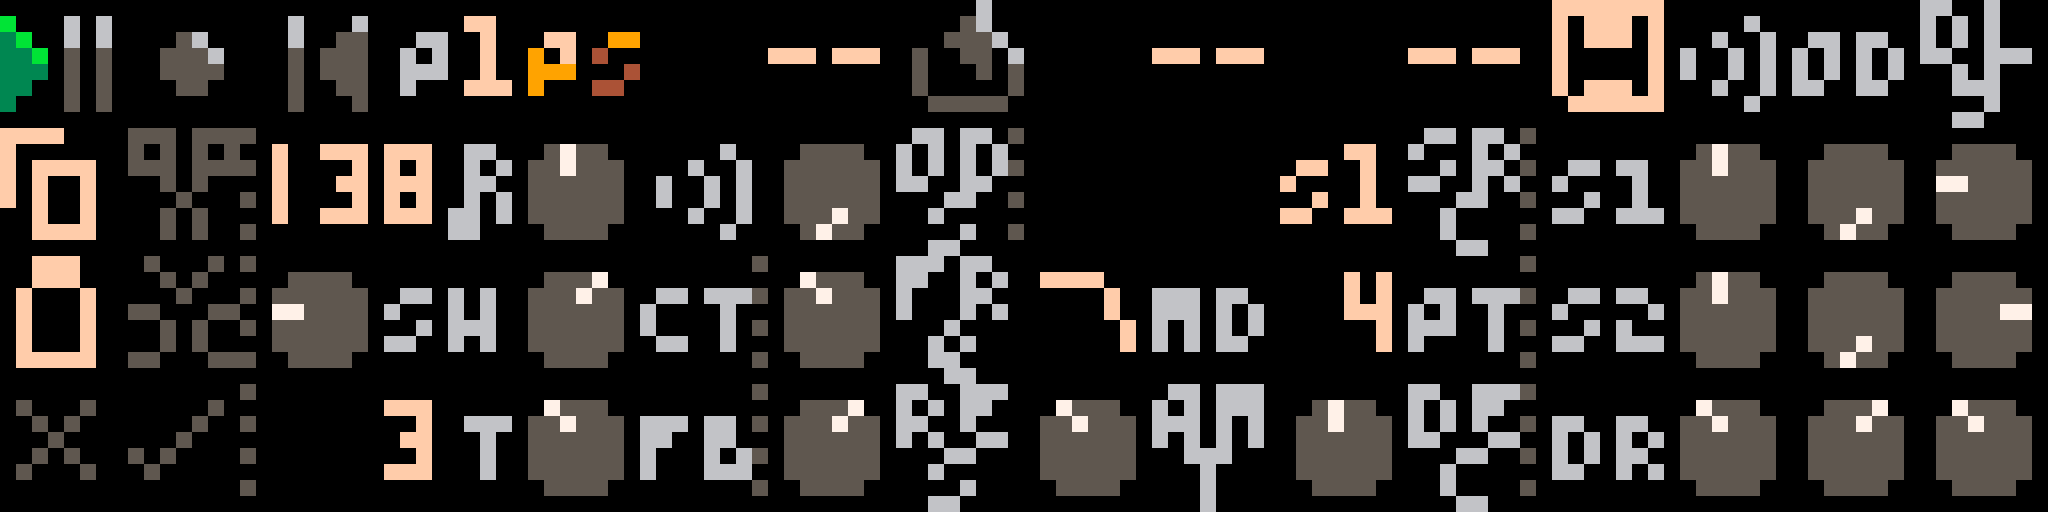
There are several controls that are shared by both the synths and the drum machine, although with slightly different layouts.
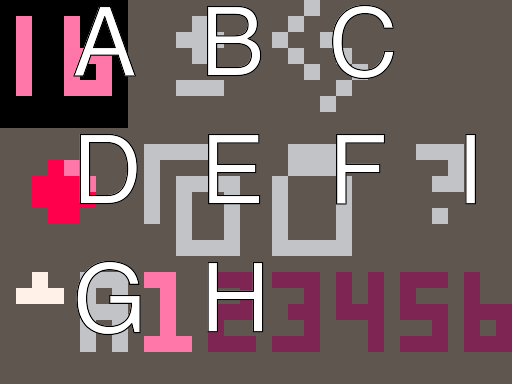
A. Pattern length. This setting controls how many steps are played each time the pattern repeats, and is stored separately for each pattern. It can be used to create interesting rhythmic effects when set to values smaller than 16, since the pattern will repeat starting at different points in each bar. With patterns shorter than 16 steps, where the pattern starts in each bar is fixed and cannot be changed. On the drum mahcine, each drum can have a different value.
B. Pattern transpose. Dragging up and down on this button allows you to transpose the notes in the pattern. On the drum machine, it is only available when viewing sequencer page 2, when the drum machine step buttons are replaced with interval controls, and it applies only to the selected drum track. shift+up and shift+down when this button is selected allows transposing by octaves.
C. Pattern rotate. Dragging up/down on this control rotates the steps for the current pattern right/left on the step grid. On the drum machine, it rotates the currently selected track only.
D. Device enable. This button controls whether the device's sequencer is active. When inactive, the device will not play any new notes. If you change this value in the middle of a bar, it will take effect at the start of the next bar.
E. Pattern copy. This button copies the currently selected pattern. The two synths share a copy buffer, allowing you to copy patterns between the synths. The drum machine has a separate copy buffer.
F. Pattern paste. This pastes the copied pattern into the currently selected pattern. On the drum machine, left click will paste the entire pattern across all tracks, right click will paste the currently selected pattern only.
G. Pattern bank select. Dragging up and down on this control lets you move through the 8 pattern banks. You can also press b to jump each device's bank selector to the bank containing the currently selected pattern.
H. Pattern select. These buttons select which pattern is currently playing/active. Any selections made in the middle of a bar will take effect at the beginning of the next bar.
I. Randomize pattern. This will randomize the currently selected pattern. On the drum machine, it randomizes the currently selected track only. See the [Pattern Randomizer] section for more information.
Synths
The two synthesizers are two-oscillator paraphonic synths with 24 db/octave lowpass filters and built-in step sequencers. (Paraphonic means, in this case, that the oscillator pitches can be sequenced separately.) The filter cutoff frequency is modulated by a simple one-stage envelope.
Sound Controls
There are several sound controls on the synth: a waveform selector and a bank of knobs.
Waveform selector. The waveform selector allows you to toggle between a square wave and a saw wave.
Tn. Synth tuning in a +/- 12 semitone range.
Fn. Fine tuning of the second oscillator in a +/- 1/2 semitone range.
Mx. The mix between oscillators 1 and 2.
Ct. Filter cutoff.
Rs. Filter resonance.
En. Filter envelope depth.
Dc. Filter envelope decay.
Ac. Filter accent depth.
Sequencing
The synth is sequenced using the standard step buttons, with 5 different step types (off, dim red, bright red, dim yellow, bright yellow). Bright steps are accented, dim steps are unaccented. Red steps are played normally, yellow steps are slides. A slide step will slide smoothly to the next step's pitch, and will prevent any envelopes from retriggering on the next step.
The step pitch controls are below the step buttons. On sequencer page 1, these control the pitch of oscillator 1. On sequencer page 2, they control the coarse tuning of oscillator 2 relative to oscillator 1.
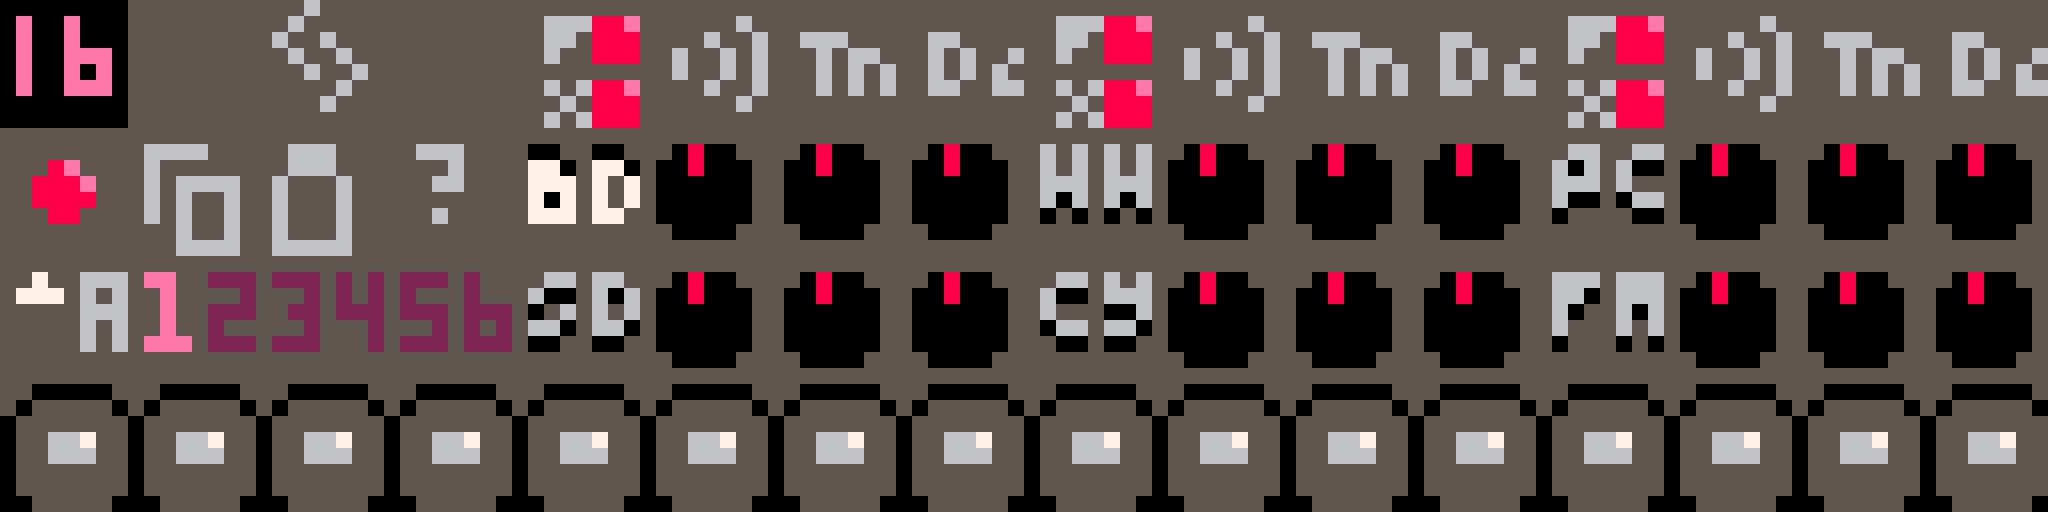
Drum Machine
The drum machine offers six different drum tracks. Each track offers two different drum sounds, each at two different volume levels. Sound selection is indicated by step color: one sound is red, one sound is yellow. Sound intensity is indicated by button light intensity: brighter steps are louder, or accented.
Each sound has two different controls: Tn (tune) and Dc (decay). These controls work slightly differently for each sound. Each track also has its own step pattern with its own length, and you can use step patterns of different lengths to create polyrhythms. The drums can be transposed by semitone in the second sequencer page.
By default, all of the six tracks are processed through the overdrive and delay effects, as well as the pattern filter if its source is set to DR. You can cycle through the FX button settings for each pair of tracks to turn on or off the effects for each track separately. When effects are bypassed for a track, that track is not processed by overdrive, not processed by the pattern filter (if the pattern filter is set to DR mode), and not sent to the delay send bus.
Bass Drum (BD)
The bass drum sounds use simple waveforms that start out at high volume and pitch, then rapidly decay to low volume and low pitch. The Tn knob controls the starting pitch, and the Dc knob controls now rapidly the volume and pitch decay. When not transposed, the ending pitch is approximately 49 Hz (G1). Transposing the drums affects both the starting and ending pitch.
Red sound: This is an approximately 808-style bass drum using a sine wave and simple exponential envelopes.
Yellow sound: This is closer to a 909-style bass drum. It uses a triangle wave, and the exponential envelopes are limited at the start of the drum hit, in order to approximate a compressed sound.
Snare Drum (SD)
The snare drum mixes a sine wave exponentially decaying in pitch and volume, like the bass drum, with exponentially decaying noise. This whole signal is then sent through a gentle highpass filter. The Tn knob controls the pitch of the sine wave, and the Dc knob controls the decay time of the envelopes.
Red sound: This is a short, snappy, noisy snare drum. The tonal sine wave component is fairly quiet, and the decay times are relatively short.
Yellow sound: This is a slightly heavier, darker snare. The tonal component is louder, the decay is longer, and the highpass filter is set slightly lower to retain more midrange frequencies.
Hihat (HH)
The hihat is a short burst of noise, mixed with several high-pitch detuned square waves at inharmonic frequency ratios. All of these are highpass filtered, and decay exponentially in volume. The Tn knob controls the pitch of the square waves, and the Dc knob controls the decay time. Both closed and open hihats are on this track, so playing a closed hihat will cut off an open hihat sound (and vice versa), allowing you to achieve a classic hihat choke effect.
Red sound: This is a closed hihat with shorter decay.
Yellow sound This is an open hihat, with a longer decay.
Cymbal (CY)
The cymbal sound is generated identically to the hihat (HH) sound, but this track is tuned for longer decay times and slightly higher pitches. The knobs work identically to the hihat knobs. Like the hihats, the cymbals will mute each other - this is not a typical effect, but try it out and see what happens!
Red sound: This is a cymbal with a shorter decay, like a ride.
Yellow sound: This is a cymbal with a longer decay, like a crash.
Percussion (PC)
This sound is synthesized identically to the bass drum (BD), but at higher pitches and with shorter decay times. By changing the tuning you can create sounds similar to toms, congas, rimshots, and more. Play around and see what you get!
Red sound: Same as BD.
Yellow sound: Same as BD.
FM (FM)
This is an FM sound made from two sine wave operators. You can use this to make metallic or other tonal percussive sounds. The pitches of each operator remain constant during each drum hit, but both the volume and the amount of modulation decay exponentially. The Tn knob controls the operator frequency ratio, and the Dc knob controls the envelope decay times.
The frequency ratios range from 1/4 (at the bottom end of the knob range) to 4 (at the top end of the range). Each increment of 32 in the knob value doubles the frequency ratio, so the default position of 64 corresponds to a frequency ratio of 1, and Tn knob values that are multiples of 8, 16, or 32 will produce less dissonant sounds. Try the shift+up arrow and shift+down arrow hotkeys to step through Tn knob settings in steps of 16.
Red sound: Light modulation intensity, producing cleaner, simpler sounds.
Yellow sound: Heavy modulation intensity producing harsher, more complex sounds.
Effects
RP-8 contains several effects to help shape the sound of the synths and drum machine. Please refer to the audio routing diagram from the [Audio Routing] section for more information.
Overdrive
There are three overdrive units, one for each of the two synths and for the drum machine. Each one independently distorts the audio for its device. The OD knobs in the mixer section control the intensity of the overdrive effect for each device, and the ODS knob (OverDrive Shape) controls the tone and color of all three overdrive units. Higher values produce thinner, scratchier overdriven tones with more odd harmonics.
Delay
The delay unit is a tempo-synced digital delay on a shared send bus. The delay times can be set in 16th notes (shown as number of 16th notes, 1-16), 16th note triplets (shown as 1T-16T), or dotted 16th notes (a number of 16th notes plus a 32nd note, shown as 0D-15D). The FB control controls the amount of delay feedback. There is a small amount of highpass filtering in the delay feedback loop so the delayed sound does not become too muddy.
Pattern Filter
The pattern filter is a 2 pole state variable filter with lowpass and bandpass modes. It differs from the other effects in that it can take its signal from several possible different sources. These are controlled by the SRC control. The possible sources are - -, or disabled, S1, S2, and DR, for the synths and the drum machine, and MA, for the main audio output after the mixer.
The MD control selects the filter mode: lowpass (shelf shaped) or bandpass (peaked). FRQ controls the cutoff frequency, RES the resonance, PT selects the filter pattern, and AMT and DEC affect how that filter pattern is applied.
The filter patterns control a filter modulation envelope. Each pattern is a different sequence of triggers of different intensities and timings. Different patterns have different lengths: some are 16 steps, and so line up neatly with the bar length, but other patterns are odd lengths that can help you create complex rhythmic effects. The AMT knob controls how strong the pattern triggers are: if the knob is all the way up, the strongest triggers will always bring the filter up to its maximum frequency (at least momentarily). If the knob is all the way down, the pattern will have no effect. The DEC knob controls the filter envelope decay time.
Compressor
The compressor is applied last of all RP-8's effects. There is only one control, the CT knob, which controls the compressor threshold. By default, the knob is all the way up, which means that the compressor will rarely have any effect. Reducing the compressor threshold should help make your song sound more even in volume, and should help your drum sounds and synth sounds fit together better. There's just one knob - try adjusting it and see if you like the results!
Technical details: this compressor uses linear scaling (not logarithmic) with a hard knee, a fixed ratio of 4, and fixed attack and release times of approximately 2.5ms and 60ms, respectively.
Pattern Randomizer
As a quick source of inspiration, RP-8 lets you quickly generate and alter your patterns. Use the randomizer by clicking the question mark icon on the device whose pattern you want to randomize. The randomizer has several different parameters, accessed using the ` hotkey.
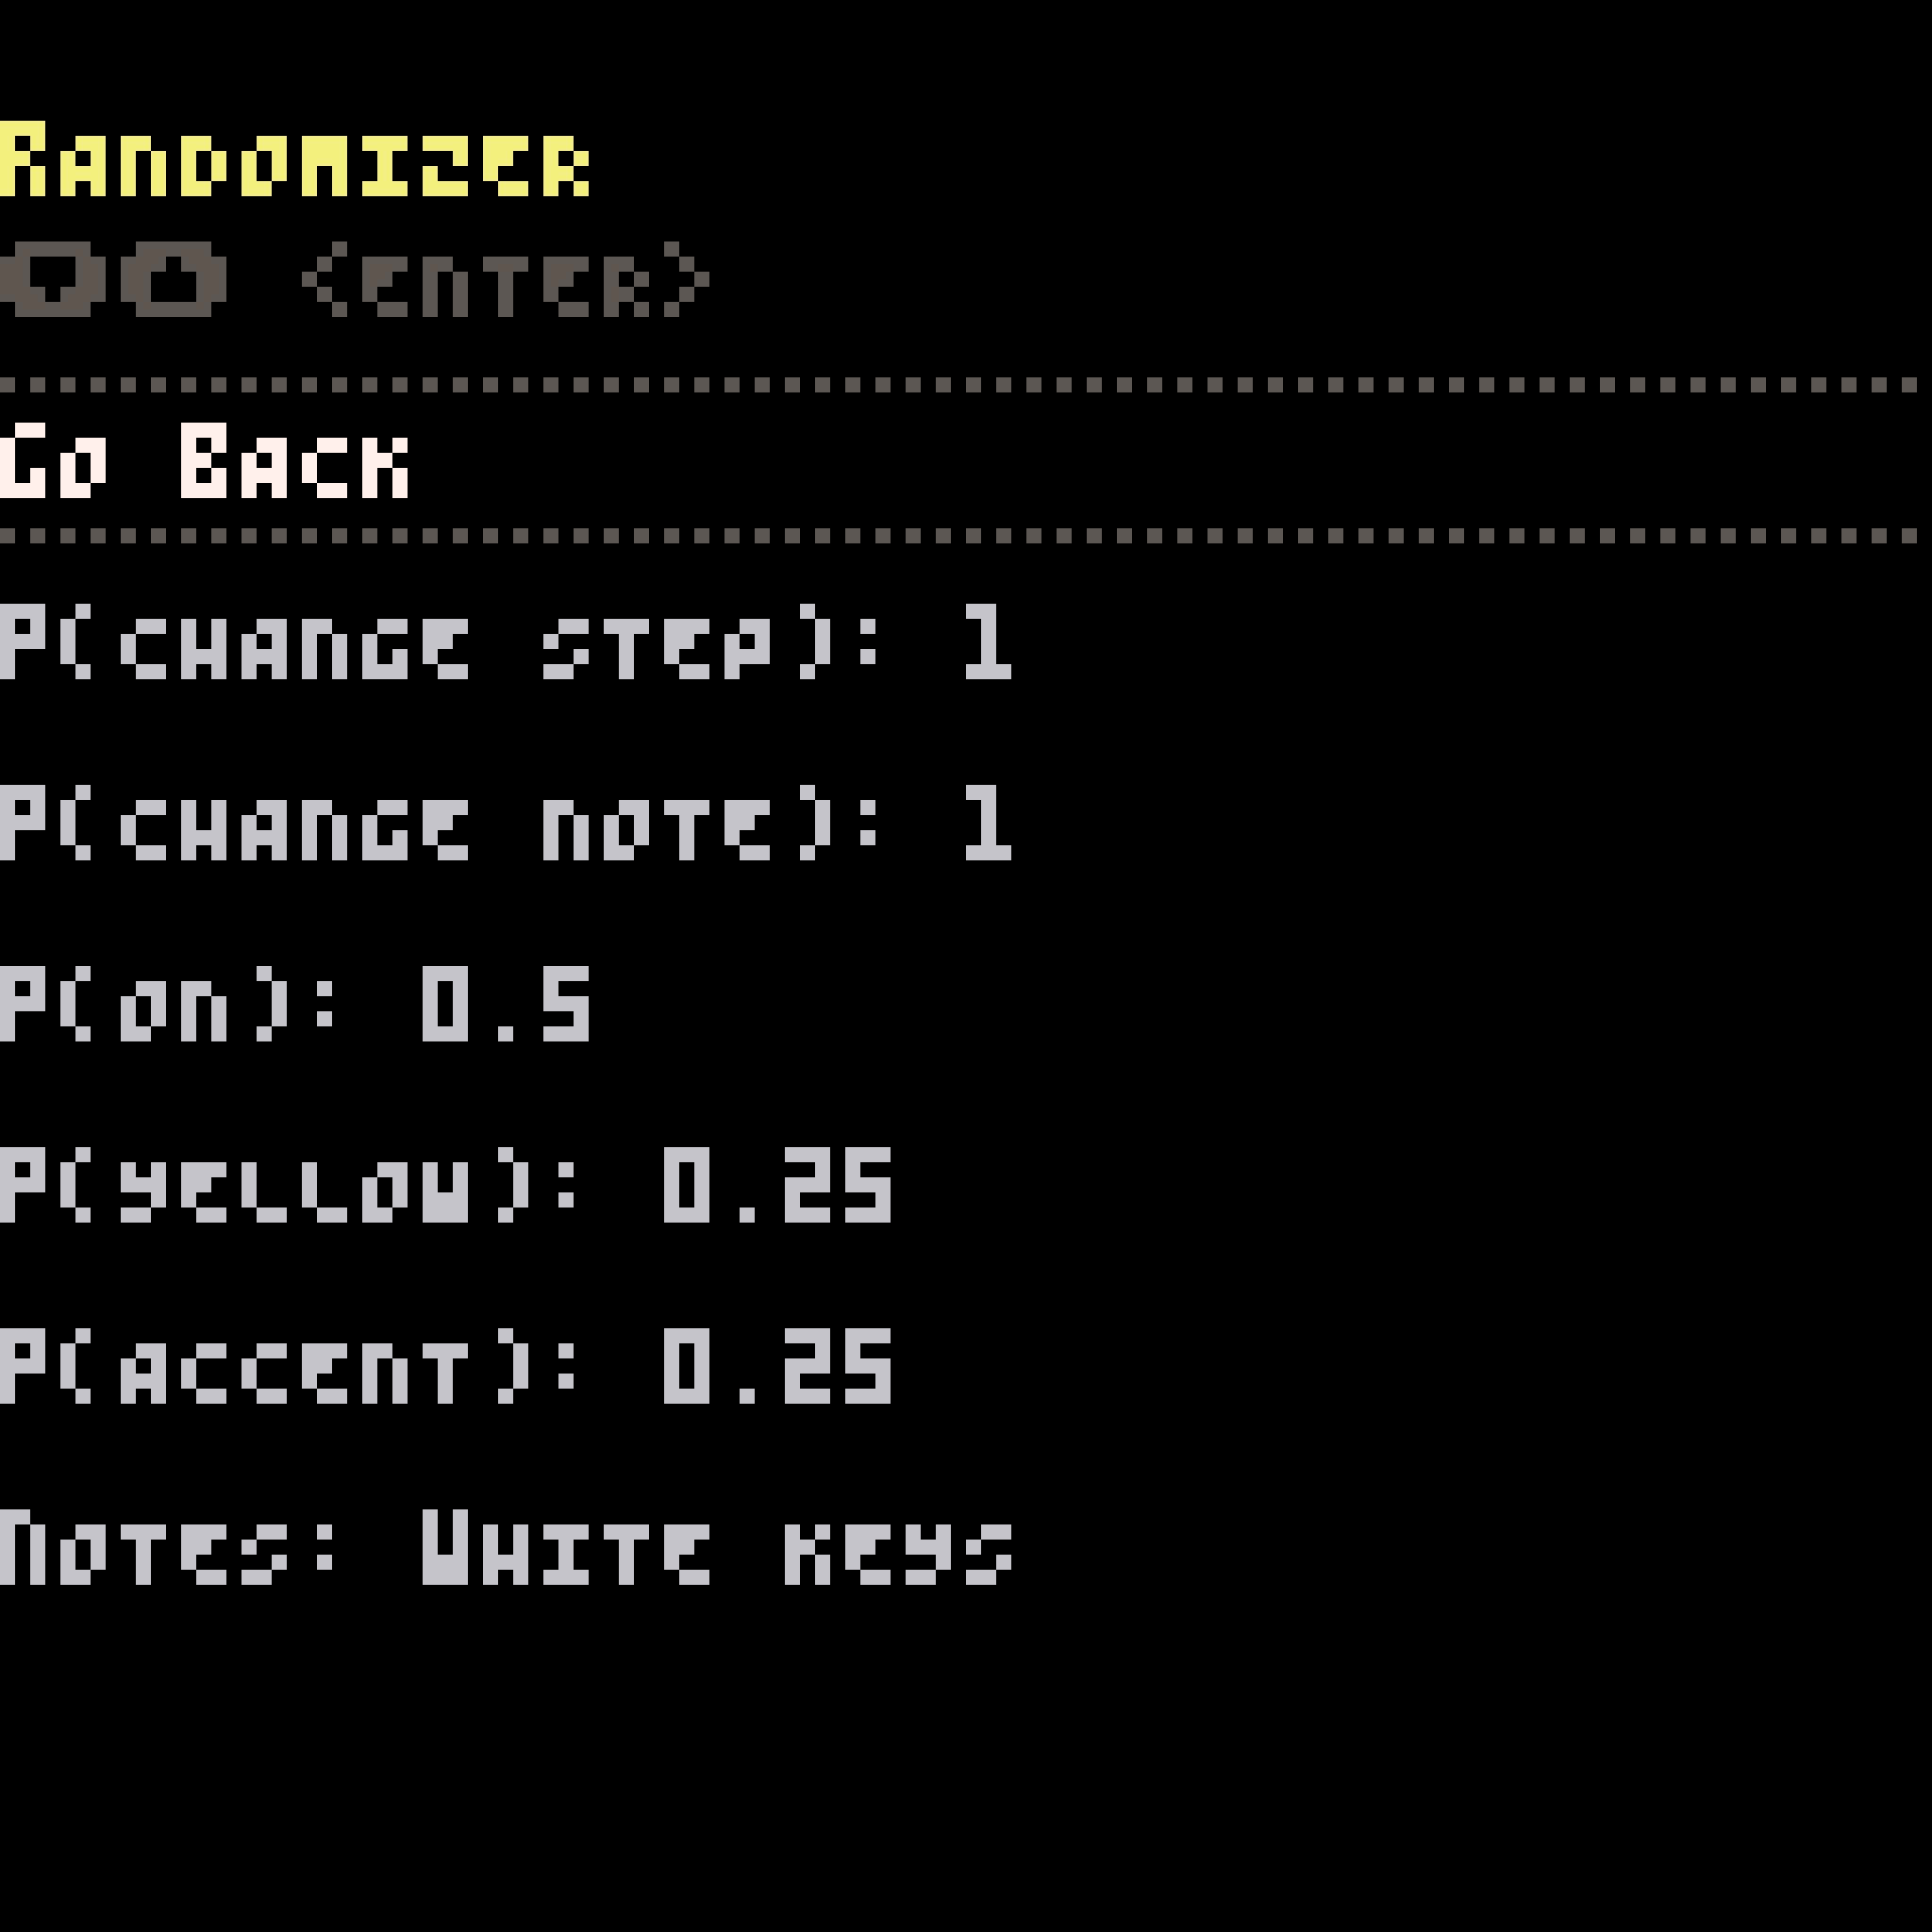
Navigate this screen with the up and down arrows, and use the enter key to toggle between the choices for each option. (More ergonomic controls may come in the future.) Select the "go back" option, or press any other key, to return to RP-8.
The options work as follows:
P(change step): The probability that each step in the pattern will have its type changed (e.g. from dark red to off, or dark yellow to bright yellow).
P(change note): The probability that each note in the pattern will be changed. No effect for drums.
P(on): If a step is changed, the probability that it will be on.
P(yellow): If a step is changed and on, the probability that it will be yellow instead of red.
P(accent): If a step is changed and on, the probability that it will be accented / bright instead of unaccented / dark.
notes: If a note is changed, this controls which notes it can be changed to. Currently, the options are "white keys", "black keys", and "all". No effect for drums.
Keyboard Controls
You can press h at any time to get a list of these shortcuts in RP-8. If keyboard shortcuts appear to not be working, check to see if you have caps lock enabled: these shortcuts only work with caps lock off.
All Modes
| key | action |
|---|---|
t | toggle tooltips on/off |
s | save song to RP-8 folder and to clipboard |
o | load song from clipboard |
p | save song to clipboard only |
tab | switch sequencer page |
space | toggle play/pause |
m | toggle song/pattern mode |
e | stop/start exporting audio |
g | change each bank control to the current pattern's bank |
f | open the file menu |
up | increase selected control one step |
down | decrease selected control one step |
shift+up | increase selected control multiple steps |
shift+down | decrease selected control multiple steps |
left | go to previous pattern step |
right | go to next pattern step |
0-4 | on pattern buttons: set step type |
` | configure randomizer |
Song Mode Only
| key | action |
|---|---|
backspace | rewind to beginning of loop (single tap) or bar 1 (double tap) |
l | toggle loop on/off |
r | toggle recording on/off |
x | clear control overrides |
c | commit control overrides to loop |
b | copy first step of current loop |
n | copy last step of current loop |
[ | paste to selected control only |
] | paste sound only (controls but not pattern selections) |
, | previous bar |
. | next bar |
< | move loop start backwards by loop length |
> | move loop forwards by loop length |
-
TR-808 bass drums with long decay times are often used as bass sounds. The FM and percussion tracks of the drum machine can also easily be used as additional tonal voices. ↩